Showing posts with label recipes. Show all posts

Sunday, November 3, 2013

Butternut Squash Soup with Sweet Potato and Coconut {Recipe}

It's that time of year when winter squash is coming out the wazoo, toppling out of large crates at grocery stores and dominating roadside produce stands. This ubiquitous fall veggie is tasty, easy to prepare, super-inexpensive and packed with nutrients such as vitamins A and C, dietary fiber and omega-3 fatty acids. And it's a perfect early food for babies too!

One of our favourite ways to prepare squash is pureeing up a big batch of soup. We've tried numerous variations but always come back to this one which has the perfect (in my opinion!) balance of savoury, sweet and aromatic flavours. We use butternut squash but any (or most) of the other types of winter squash could probably be used instead.


Butternut Squash Soup with Sweet Potato and Coconut

Prep Time: 20-30 minutes
Total Time: 2 hours
Yield: 4 large bowls

Ingredients:

  • 1 medium butternut squash
  • 1 medium sweet potato
  • 1 tablespoon coconut oil
  • 1 small onion
  • 3-4 gloves garlic
  • 2.5 cups chicken broth
  • 1 can coconut milk
  • 1/2 teaspoon ground cinnamon
  • 1/4 teaspoon ground allspice
  • 1/4 teaspoon cayenne (optional)
  • 1 teaspoon sea salt
  • 1/4 teaspoon pepper

(Note - choose organic ingredients where possible.)


Steps:

  1. Cook the squash. I like to cut it length-wise and bake it cut side up at 350 degrees on a baking sheet with a little water at the bottom until tender. (60-80 minutes usually does the trick.)


  2. Cook the sweet potato. I cut it into medium-sized chunks, throw 'em in my stove-top steamer, bring to a boil and steam for 8-10 minutes.


  3. Saute onions in coconut oil (medium heat) until translucent - about 6-7 minutes. Add garlic and saute for another 3-4 minutes.


  4. Once the squash, sweet potato and onion/garlic mixture have cooled slightly, use a standard or immersion blender and puree these ingredients together with the chicken stock. If using a standard blender, you'll probably need to puree in batches.


  5. Transfer pureed ingredients into a large pot or dutch oven. Stir in coconut milk and spices, bring to a low boil and simmer for 10-15 minutes.


  6. Serve with an additional sprinkle of cinnamon and pepper (and/or a dollop of yogurt or extra coconut milk, if desired) and enjoy!


Do you enjoy winter squash? What's your favourite way to prepare it? 

Wednesday, September 25, 2013

Mini Apple & Pear "Pizzas": A Fun & Healthy Snack! {Recipe}

Our 34-month-old is not only an impressive eater, but she also loves helping out in the kitchen! As such, I recently stayed up way too late on Pinterest gathering healthy, kid-friendly food & cooking ideas to help cultivate her interest.

One of the neatest-looking "recipes" I came across was for apple sandwiches - colourful, all-natural, low-carb and definitely something a young kiddo could help make and would surely love to chow down on! A couple days later we set out to whip up a batch, but found our direction changing somewhat. First, we had both apples and pears lying around so we used one of each, and second, we found it quicker and easier to both make and eat the li'l guys when kept open-faced - i.e. "pizzas" instead of sandwiches! Finally, we got quite creative with the sauce and toppings. The result - total yumminess! My mom said they were reminiscent of healthy candy apples, and I think she hit the nail on the head with that one!


Mini Apple & Pear "Pizzas"

Prep Time: 10 minutes (even with a preschooler's help! ;)
Yield: About 12 mini pizzas - a good snack size for two kiddos, or one kiddo + mom!

Ingredients:
  • One sweet apple (e.g. Royal Gala)
  • One semi-firm pear (we like Bartlett but any should work)
  • Natural nut butter (peanut, almond, cashew, etc.)
  • Liquid honey (optional)
  • A selection of raw, unsalted nuts and seeds (we like cashews, almonds, sunflower seeds and pumpkin seeds, and sometimes we sprinkle on some hemp hearts and/or chia seeds for an added healthy boost!)
Steps: 
  1. Gather your ingredients. Building the pizzas is way easier (especially with a wee one) when you're not running around grabbing stuff midway through!

  2. Ready your pizza "crusts"! Cut approximately 1/4" slices off opposing sides of the apple until you reach the core, and repeat with the pear. Eat (or save) the outermost slices as these will be too small and won't sit flat, and do the same with the remainder of the fruit after you finish slicing the opposing sides (unless you don't mind a few narrower, rectangular pizzas, in which case you can slice down the remaining sides too!) (Note - make sure your helper is a safe distance away and/or is acutely aware of knife safety for this step!)

  3. Arrange crusts on plate(s) and spread a thin layer of nut butter on each one.

  4. Drizzle a small amount of honey across all crusts. My daughter loves to help with this part!
  5. Decorate your pizzas. Here's where your little sous chef can really shine! Have them press in, sprinkle and shake on the toppings to their heart's content - or until their hunger gets the better of them! ;)
  6. Enjoy!!


What are your favourite creative snack ideas to make and enjoy with your little ones?

Sunday, August 4, 2013

What To Do With All That Zucchini: 7 Ideas

Zucchini (or summer squash) is one of our favourite veggies to grow in our garden. It's easy to grow, resilient & adaptable, isn't prone to attracting pests and the yield is phenomenal. This year we have 6 plants, and since early in July they've been producing close to one new zucchini per day. My father and stepmother have an even more abundant zucchini situation going on - probably closer to two per day! While it's awesome to have so much fresh, healthy veg, one can only enjoy so many zucchini & onion stirfries. So needless to say, we've done a fair amount of research and experimentation in our household to find other tasty ways to enjoy this prolific veggie. Here are our Top 7 ideas!


  1. Make muffins or bread. Like the aforementioned stirfry, this one's a bit of a given. Finely-grated zucchini adds nutrition, moistness and a depth of flavour to bread products without actually contributing a zucchini-like taste. This is a great way to sneak in some greens for picky eaters! And with zillions of different recipes out there, you certainly don't have to stick with the same one every time! Try gluten free, or combine it with banana, applesauce or carrot. Nuts work well too!
  2. Throw some into a casserole. Casseroles, of course, make for quick & easy meals, so naturally they're a favourite of many families. I made a variant of this dish the other day using four grated zucchinis instead of spinach, and ground turkey to bulk it up. The resulting dish was yummy, filling and super-healthy - definitely a keeper! (Stay tuned for a possible blog post on this!)
  3. Make zucchini "boats". Wondering what to do with those baseball bat-sized zukes you'll find after neglecting to harvest for a few days? They're pretty tough and seedy, so need a little sumpin' extra to achieve tasty status. Perfect solution - make stuffed zucchini boats! Basic technique - chop 'em in half, scrape out the centers, incorporate your choice of other ingredients (other veggies, meat, cheese, etc.), stuff the mixture back in and bake or barbecue until delicious. Lots of recipes out there to try out, or make up your own!
  4. Whip up some fritters. This is one of my favourite ways to use zucchini as fritters are ridiculously easy to make (especially if you have a food processor) and awesome as a side. I love frying 'em up in coconut oil for a little extra flavour and crispiness.
  5. Slice 'em into zucchini noodles (or "zoodles"!). This is a particularly awesome idea for those on a gluten-free (or completely grain-free) diet craving some pasta or noodle soup. I have to admit, I haven't mastered the technique for these just yet myself, but I'm going to keep trying. If I do end up embarking upon an anti-candida diet, this'll definitely have a place on the menu!
  6. Enjoy it raw.. I didn't even consider zucchini to be a veggie you can eat raw until I had the pleasure of trying it julienned into a salad at a cooking class last year. Crunchy, fresh and slightly sweet, this dish had me wondering why a raw preparation isn't more common.
  7. Freeze it. Got a row of zukes 3 feet long lining your counter, or simply out of inspiration? Then toss some in your freezer to enjoy off-season! To store chopped zucchini, you'll want to blanch it first, however grated zucchini (for use in baked goods, etc.) can be frozen raw - just squeeze a little liquid out of it first.

How do you like to eat zucchini? Got any favourite recipes?

Saturday, August 3, 2013

Sweet & Savoury Maple Spring Salad {Recipe}


Each year at the cottage with my inlaws on Saint Joseph Island, we brunch at Gilbertson's Pancake House, a lovely seasonal restaurant which showcases the family's tasty maple products. I usually load up on traditional breakfast fare such as sausage, pancakes and french toast, but this year wanted to go for something a little lighter so tried the maple spring salad with chicken, featuring their in-house sweet & savoury maple dressing. It was heavenly. I almost bought a bottle of the dressing to take home, but it was pricey and I figured hey - it can't be that hard to make! Especially since the ingredients were listed on the back of the bottle. Unfortunately, I made the dubious decision to commit the list to memory, and then on the ride home realized I'd forgotten at least a few items. Oops. But when it came time to recreating the dish at home, I ended up doing a pretty good job. (Well, at least I think so. I hope you'll agree!)

This salad meets all the key requirements to earn a spot on the regular rotation in our household. It's delicious, super-quick to make, versatile and it's made with clean ingredients. It *is* indulgent, however, so how healthy it ultimately is may be for up discussion. ;)


Sweet & Savoury Maple Spring Salad

Prep Time: 6-7 minutes
Yield: 1 single-serve bowl of salad (multiply the ingredients accordingly for additional servings)

Ingredients - Salad:
  • 1/4 pear
  • 1/4 apple
  • 3 slices high-quality old cheddar cheese, cut in small pieces
  • 20(ish) pecans, lightly toasted
  • A few thin slices of red onion (optional - I didn't include these in the version above)
  • Handful of spring mix

Ingredients - Maple Dressing:
  • 1 1/2 tbsp olive oil
  • 1/2 tbsp maple syrup
  • 1 tsp dijon mustard
  • 1/2 tsp apple cider vinegar
  • 1 pinch of celtic sea salt
  • Pepper to taste

Steps:
  • Layer salad ingredients in a bowl starting with spring mix
  • Whisk together maple dressing ingredients and pour evenly on top of salad
  • Enjoy!

Thursday, July 25, 2013

No-Bake Coconut Almond Date Energy Balls {Recipe}


Until recently, I often found myself in a quandary. I'd crave sweets, but the options readily available to fulfill the craving weren't winning any nutritional awards. As a believer in (and general abider by) a clean, healthy diet, I'd either grumpily abstain or give in and endure the subsequent guilt and (all too often) havoc wreaked on my system.

But then I discovered No-Bake Energy Balls, and All Was Well With The World! (And this is only a minor exaggeration - I promise!)

So what are NBEBs, you may ask? Basically, they are bite-sized morsels of deliciousness made of healthy ingredients which provide energy and other nutritional benefits. And, duh, they don't require baking. Nor cooking in any other way, for that matter. You just need a bunch of pantry staples and a means of mashing them up together (generally a food processor). A full batch takes only minutes to prepare, and the lack of heat and chopping means little hands can get in on the action too. Perfect for young, busy families!

A quick search turns up approximately a jillion NBEB variants, however I have arrived at what I humbly believe is the awesomest of them all. They're ridiculously tasty (and I'm not alone here; almost everyone I've shared them with has requested the recipe), chock-full of key nutrients such as iron, fibre and omega 3 fatty acids, and ridiculously tasty. Wait - did I say that already? :) 


No-Bake Coconut Almond Date Energy Balls

Prep Time: 8-10 minutes
Yield: 24 balls (approx)

Ingredients:
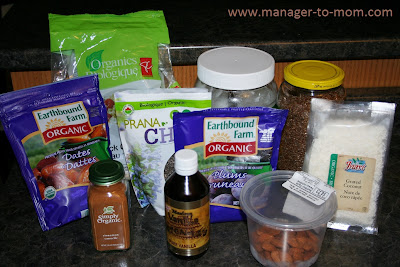
  • 10 pitted dates
  • 4 pitted prunes
  • 1/2 cup sliced almonds
  • 1/2 cup shredded coconut + 1/2 cup for rolling
  • 1/2 cup one minute oats
  • 2 tbsp coconut oil
  • 1/2 tbsp flax seeds
  • 1/2 tbsp chia seeds
  • 1 tsp vanilla extract
  • 1/2 tsp cinnamon
  • 1/3 to 1/2 cup water (Depending on how moist you prefer them. I use 1/2 cup myself.)


Steps:
  • Put everything except water and 1/2 cup shredded coconut into a food processor.
  • Pulse for 20-30 seconds until items are incorporated.
  • Slowly add water and continue to pulse until "batter" is moist but not runny.
 
  • Form into balls about one inch in diameter
  • Roll each ball in extra shredded coconut
  • Refrigerate and enjoy!

A couple notes:
  • Up until now, I've thrown in the almonds as-is. The next time I make the recipe, I might try soaking them for 24 hours to improve nutrient absorption and reduce the beating endured by my food processor. Other recipes also suggest soaking the dates and prunes for up to an hour, as this helps them incorporate more readily. Another thing to try out.
  • As fabulous as this exact recipe is, the beauty of the NBEB is that it's so flexible. So feel free to add, remove or swap ingredients based on your own preferences, availability, etc. (Though note that you may need to adjust the amount of water accordingly.) I'll probably try some variants in the future myself - e.g., pecans or nut butters instead of almonds, cocoa powder instead of cinnamon, etc.

Do you like to make energy balls or any other types of healthy no-bake desserts? What are your favourite recipes?

Wednesday, May 8, 2013

Sautéed Red Swiss Chard with Lemon & Coriander {Recipe}

We get an organic produce basket delivered each week, and its contents are always unique (based on availability, season, etc.) giving us ample opportunity to try new dishes & methods of preparation. A recent box contained red swiss chard, a vibrant leafy green with bright crimson stalks.


According to whfoods.org, it ranks second only to spinach in terms of nutrient-richness and is a unique source of a family of phytonutrients called betalains which have been shown to provide antioxidant, anti-inflammatory and detoxification support. So yup, it's healthy stuff!

In a throw-together meal, my husband whipped up a super-simple side using the chard which ended up being surprisingly delicious, so I knew I had to blog it. This week we received red chard in our basket once again, so I picked hubby's brain to make sure I had the details right, and got to work!

Tangy, aromatic and flavourful, this dish would match well with Mediterranean fare such as broiled white fish and roasted potatoes.

Sautéed Red Swiss Chard with Lemon & Coriander


Prep Time: 10 minutes
Cook Time: 10-12 minutes
Yield: 3-4 servings

Ingredients:
  • 1 bunch red swiss chard (about 7-8 stalks)
  • 1 medium onion
  • 1 tbsp virgin olive oil
  • Juice of 1/2 lemon
  • 1/2 tsp ground coriander seed

Steps:

Remove the stems from the swiss chard and rough chop the leaves.


Chop the onion into thin slices.


On medium heat, sauté the onion in the olive oil until cooked and beginning to brown, about 5-6 minutes. (Note - I used a dutch oven but a sauté pan or skillet would work fine as well.) Add the chard, lemon juice and coriander, and reduce the heat to medium-low.


Continue to sauté, stirring frequently, until the chard is wilted and tender - about another 5-6 minutes.


Remove from heat, serve and enjoy!

Do you enjoy eating swiss chard, or red swiss chard? What are your favourite recipes using leafy greens?

Sunday, October 28, 2012

Croatian Sauerkraut Cabbage Rolls (Sarma) {Recipe}


Do you like cabbage rolls? How about sauerkraut? If you answered yes to both of these, you MUST MUST MUST try this recipe! I insist. :) Literally everyone I've served it to has exuburently sung its praises. It results in a totally different taste (which I prefer hands-down) than your standard tomato sauce-based cabbage rolls and you boil the rolls vs. baking them. It's quite easy to prepare, it freezes well so you can make a huge amount at once, and best of all, it's uber-gentle on the wallet - less than $2 per serving!

Creds go to my besty's mom for perfecting this recipe and originally teaching it to me. Nothing like hands-on learning from a spirited Croatian mama, lemme tell ya! I've omitted the step of tossing the first roll against the wall to make sure it's been wrapped properly - but feel free to add this in if you're feeling zesty. :)


Croatian Cabbage Rolls (Sarma)

Prep Time: 2 hours
Cook Time: 3 hours
Yield: 25-30 rolls

Ingredients:

Cabbage Rolls:
  • 2 pre-soured cabbage heads (Approx. 7 pounds total, or 3.5 pounds per head)
  • 1 lb ground beef
  • 1 lb ground pork
  • 6-7 slices of bacon, chopped into small pieces (Note: I use a dry, cured "hanging" bacon sold at a local butcher shop, but you can use packaged bacon as well.)
  • 2/3 cup brown rice (uncooked)
  • 2/3 large onion, diced
  • 4-6 cloves garlic, diced
  • 2-3 squirts ketchup
  • 1 egg
  • 2 tsp paprika
  • 1 tsp salt
  • Handful of parsley, diced 
Paprika Roux:
  • 1 cup canola oil
  • 3 tbsp flour
  • 2 tsps paprika
  • 1/3 large onion, diced

Steps:

Note: If you are purchasing cabbage heads pre-soured, look for a consistent orangey colour - this indicates strong and even fermentation (better flavour!)


Set two big bowls beside the sink. Pull leaves off each cabbage head and rinse under running water.


Place 2-3 of the largest outer leaves and the smallest leaves / inner core in the first bowl. For each remaining leaf, cut a layer off the raised part of the stem (down the middle of the outer side) with a paring knife to make it even with the rest of the leaf. Place in the second bowl. (Note - you can omit this step if you're pressed for time or feeling lazy. I often do. ;) Chop all the leaves in the first bowl into very thin strips and place back in the bowl.


 Chop bacon into small (approx. 1 inch) pieces.


Combine the ground beef, ground pork, brown rice, 2/3 diced onion, garlic, ketchup, egg, 2 tsp paprika, salt and parsley in a big bowl.


Set a 15 litre stock pot, the second cabbage bowl (with the medium-sized leaves) and the filling mixture all within reach. Sprinkle 1/3 of the chopped cabbage strips into the bottom of the stock pot.


Open a cabbage leaf and place a palm-sized amount of the filling mixture inside the leaf at the bottom of the stem (this amount will vary depending on the size of the leaf.)


Loosely roll up to the opposite edge of the leaf. Push each side of the roll inward until it is tucked in. (Note: if the roll is properly soured the ends should push in easily.)


Place roll inside the stock pot with the outer edge facing upward. Repeat until the bottom layer of stock pot is filled.


Next, spread another 1/3 of the chopped cabbage strips over the rolls, and sprinkle half of the chopped bacon on top. Create and place the rest of the cabbage rolls on a second layer using the same method as the first layer. Spread the remainder of the stripped cabbage and chopped bacon on top. If there are any additional leaves which were not used up, you can chop these into thin strips and place on top as well. Fill the pot with water so that all rolls and cabbage strips are fully covered.


Bring to a boil at medium-high heat, and then reduce and let simmer.    

Once water is simmering, heat canola oil in a small saucepan on medium-high heat. Slowly whisk in flour, and then add remainder of diced onion. Stir constantly for about 5-6 minutes until onion begins to brown.


Remove from heat, stir in paprika and immediately pour evenly over top layer of rolls. Continue to let rolls simmer for about 3 hours.

To serve, ladle 2 rolls into each bowl along with some cabbage strips, bacon and broth. Serve with a simple starch (e.g. mashed potatoes or dinner roll) and a side salad. Enjoy!!

Wednesday, March 28, 2012

"Anti-Sick" Recipe: Onion, Lemon and Honey Drink

This past Winter, my family was constantly sick. We'd get over one illness and boom, down we were with another. Strep, gastro, multiple colds & the list goes on. I'm pretty sure the entire staff at the walk-in clinic knows my astrological sign by now.

In addition to all these maladies, I was also battling general fatigue and brain fog, so I decided to be proactive about the whole situation and booked an appointment with a local naturopath.

I'm so glad I took this step! 2 1/2 months later, I can definitely say I'm feeling a lot more energetic and focused.

And as for the sickies? Well, one of the many fascinating health "tools" my ND supplied me with was a recipe for an onion drink.

"An onion drink?" you say, scrunching your nose.

Yes indeed! Though I promise you that it's actually quite good.

And more importantly, since I started drinking this li'l concoction, I haven't been sick. At all. Despite the fact that I continue to encounter germ factories posing as humans on a regular basis (including my husband who's currently battling a narsty sinus infection, poor guy.)

Not making any "official" medical claims here. Just sayin'

So why an onion drink, you still may want to know. Well, similar to garlic, onions are packed full of immune boostin' phytonutrients and other goodies which helped earn 'em a spot on the The World's Healthiest Foods list.

But seriously - isn't the flavour kind of gross? Nope - the opposite, in fact. It's refreshing and tangy, with a hint of sweet.

Want to try it out for yourself? Well, it's your lucky day! :)

Onion, Lemon and Honey Drink

Ingredients:
  • 1 large red onion
  • 1 lemon (preferably organic)
  • 1 tablespoon raw honey
  • Water

Steps:
  • Chop up onion and place in 32oz resealable jar (e.g. mason jar or pickle jar).
  • Cut lemon into 4-6 pieces and squeeze into jar.
  • Seal jar and refrigerate for 3 hours.
  • Heat honey until it's in a liquid state and pour into jar.
  • Fill jar with water. Leave about an inch of air at the top.
  • Seal the lid tightly and shake shake SHAKE!!!
  • Refrigerate overnight.
  • Pour and enjoy!


Note: If you're feeling brave, you can eat the onions too. I don't personally love how they tend to "make an appearance" again later, however, so I stick to the drink myself. :)

What do you do to boost your immune system during cold & flu season?

Sunday, January 29, 2012

Vegetarian Burritos with All the Fixins {Recipe}

If you're one of the skeptics out there convinced that vegetarian food cannot be hearty nor flavourful, this one's for you.  (Assuming you like Mexican food as well, that is. :)


My hubby has made a variant of this recipe probably 8-10 times now, perfecting it along the way. The flavour combinations in this dish are explosive, the colours are certainly pleasing to the eye and it is such a fun meal to eat with all the different components. Depending on your preference, you can kick up the heat factor or not. Either way, it's exquisito! Health-wise, you're doing pretty well too with all the veggies, brown rice and beans.

It does take some time to put everything together, but it's not hard nor precise work. You can prep the filling the night before if it's more convenient.

Prep Time: 30-40 minutes
Cook Time: 60-70 minutes
Serving Size: 6

Ingredients:
  • 1 large onion, diced
  • 4 cloves garlic, diced
  • 1 green pepper, diced
  • 2 tsp cumin
  • 1 tsp coriander
  • 1/4 tsp cayenne (optional)
  • 1/2 large jalapeno, diced (optional)
  • 1/2 large jalapeno, sliced (optional)
  • 1 19 fl oz / 540 ml can of black beans, rough mashed
  • 2 cups old cheddar cheese, grated
  • Handful of cilantro, rough chopped
  • 1 cup frozen corn, thawed
  • 3/4 cup brown rice, cooked
  • 6 large whole wheat torillas
To Serve on the Side:
  • Salsa
  • Sour cream
  • Avocado slices
  • Refried beans (heated)
  • Cilantro

Steps:

1) Preheat oven to 375 degrees

2) Saute onion, garlic, green pepper, diced jalapeno, cumin, coriander and cayenne on medium heat until vegetables are tender.


3) In a big bowl, mix together sauted veggies, black beans, rice, corn, half the cheese, half the cilantro.


4) Spoon a good-sized "long dollop" of burrito mixture onto a torilla, placing it closer to one side than the other and leaving some room at each end. This should give you a pretty good idea of size and placement:


5) Starting at the side closer to the mixture, firmly roll up the burrito.


6) Repeat the above two steps with the remaining 5 burritos. If there is some mixture left over, don't fret - it's delicious on its own. :)

7) Place burritos in a shallow, lightly greased 10" x 14" casserole dish with the edges down. Place a clean damp wash cloth over the burritos to prevent the tortillas from drying out. Cover the dish with foil.

8) Bake for 45 minutes

9) Remove the foil and cloth. Sprinkle with the remaining cheese and sliced jalapenos.

10)  Bake for another 10 minutes. Mmm, melty! (As you can see, we only added the jalapenos to half of them this time around so that S could enjoy them too!)


11) Let stand for 10-15 minutes, serve with side items and Enjoy!

Thursday, November 3, 2011

Sausage, Bean, Tomato and "Whatever Else You Want" Soup {Recipe}


Alright, this is one of my favourite soups to make these days. It's delicious, flavourful, hearty, at least somewhat nutritious (assuming you pack it full of g00dness like I do) and ridiculously versatile. Then again, I'm of the opinion that most recipes are versatile. Food isn't black & white, y'know? :)

I do have to apologize for the crappy-ish pic above. I neglected to take one as we were enjoying our first meal from the latest batch, so I snapped one later as I was heating up some leftovers. The broth looks a little thinner and greasier here and I forgot the parm on top. But ehh, it'll have to do.

This soup is loosely based on one I found at allrecipes.com. I believe I made it (mostly) faithfully the first time and then began to adjust things based on personal taste, ingredients I had on hand, etc.

To me, the soup only has a handful of "mandatory" ingredients to get the right flavah. Just pick and choose out of the remaining optional ingredients (or add others as you see fit) and everything should come out hunky dory! Heck, you can even feel free to "live dangerously" and adjust the mandatory ingredients. That's the beauty of soup - it should all come out tasty in the end!

I recommend leaning toward organic and fresh or dried (vs. canned) whenever possible, though admittedly I use canned beans and tomatoes a lot as it's just easier. As canned goods go, Eden Organic is a great choice as all of their cans are BPA-free.

The suggested quantities below will feed at least 6-8 people (or 2-3 people with a truckload left for freezing purposes. :)

"Mandatory" Ingredients:
  • 1 large onion, diced
  • Several cloves of garlic, minced
  • About 6 fresh sausage links, skins removed and cut into small pieces. (I like garlic, spicy and/or paprika myself.)
  • 3-4 cups of tomatoes, diced (fresh or use a 28 fl oz can)
  • 7-8 cups of broth (I do half chicken, half beef)
  • 3-4 cups of white kidney (cannellini) beans and/or romano beans (dried or use two 19 fl oz cans)

Optional Ingredients (I suggest including at least 2-3 of these including a starch and at least one "green" for a rich, hearty soup!)
  • 2 potatoes, chopped into small cubes
  • 8 oz fresh pasta (e.g. tortellini)
  • 1 cup of quinoa
  • 6-8 carrots, diced 
  • 4-6 celery stalks, diced
  • 2 zucchinis, sliced in half and chopped
  • 6-7 oz of fresh, organic baby spinach
  • 6-7 oz of button mushrooms, chopped

Flavourings (to taste):
  • Fresh, chopped parsley 
  • Dried basil, oregano and/or thyme
  • Salt & pepper
  • Parmesan reggiano cheese, finely grated

Steps (Note - if you're not using a particular ingredient just skip this step):

1) In a large saucepan, saute the sausage on medium high until cooked through. Set aside.
2) Cook quinoa in a separate pot according to package directions. Set aside.
3) Saute the onion in the sausage grease (yum!) for 3-4 minutes, stirring frequently
4) Add the garlic and saute for a few more minutes, continuing to stir
5) Add the broth and bring to a boil. Reduce heat to low.
6) Add potatoes and simmer for 10-15 minutes.
7) Add carrots and celery and simmer for another 10-15 minutes.
8) Add tomatoes, mushrooms and herbs. You know the drill - simmer for another 10-15 minutes.
9) Add zucchini, pasta, beans and cooked sausage. Simmer for about 5 minutes.
10) Add spinach. Simmer for about a minute, until spinach is wilted
11) Serve with parmesan reggiano, quinoa and salt/pepper to taste!

Monday, October 17, 2011

Menu Plan Monday: Hubby's Request!

Yesterday I ate a whole jar of "store home made" minestrone soup for lunch myself (about 3 bowls worth). It was quite delicious so I mentioned to Chris that we should do homemade minestrone as it's gotta be quite easy to make. His response? Minestrone is boring - it's like the fast food of soups. :) Well then! But his follow-up suggestion was kind of awesome. He said, why don't we do a chicken curry soup? Hello yummy - I'm in!!

I've also been wanting to make a batch of "sarma" (Croatian cabbage rolls) for awhile. Sarma's a whole afternoon affair so I'll need someone to watch li'l daughts during the process. I'm thinking Saturday for this one. And if I'm feeling ambitious, we might get a recipe post out of this one! :)

Back to linking up with orgjunkie this week!


Monday:
BBQ chicken (from Sobey's)
Caprese salad

Tuesday:
Coconut-Curry Chicken Soup (using the broth from the BBQ chicken)

Wednesday:
Spinach and Mushroom Pasta Bake

Thursday:
Broiled salmon (need to decide on flavour combo)
Veg (broccoli or asparagus?)
Pasta salad (I'll grab some from Erb's, the discount foot outlet down the road)

Friday:
Curling - off dinner duty! :)

Saturday:
Sarma - recipe to follow!!

Saturday, October 8, 2011

Easy Peasy Spinach, Mushroom and Bacon Quiche {Recipe}


In my 1 year "blog-iversary" giveaway, a couple of you mentioned you would like to see more quick & easy recipe posts. I love writing these; just a matter of finding the time among the other blog commitments I have going on (and, of course, that thing called "real life" as well. ;)

Barring an allergy or strong distaste for eggs, quiche is a dish that every home cook should have in their repertoire. Why?
  • It's ridicu-easy and quick to make (and almost impossible to screw up, in my opinion). Especially if you opt for pre-made shells like I do, given my complete lack of appreciable pastry-making skills. Total preparation time? About 15-30 minutes. (15-20 if you're most people and 25-30 if you're me, because I'm inexplicably slow in the kitchen. I'm working on this.) Of course, making your own crust adds to the time as well.
  • It can be reasonably healthy. Good protein from the eggs, and adding in some greens really boosts the nutritional profile. 
  • It's flexible. The base can be readily changed up according to the ingredients you have on hand, what you have a taste for, etc.
  • It's tasty!! (Well, I think most people would agree with this, anyhow.)

So as part of this week's menu plan, yesterday I made a spinach, mushroom and bacon quiche. I was planning to use ham but ended up subbing in the bacon as I ran out of said ham earlier in the week. The result: just as yummy! I referenced a couple recipes but changed things up a bit, so I thought I'd record the actual ingredients & steps I used for future reference.

Like I already mentioned, you can totally change things up in this recipe. For example, you could replace the spinach with finely chopped broccoli, or use different spices (I've seen nutmeg and coriander powder included in other recipes.) You could adjust the proportion of milk to cream, or milk and cream to egg as well. A quiche purist might tsk tsk these suggestions (and of course, they'd undoubtedly make their own crust as well), but I personally think as long as you don't stray too far away from the basics, it all comes out tasty in the end. :)

Easy-Peasy Spinach, Mushroom and Bacon Quiche

Ingredients:
  • 2 pre-made pie crusts (285g total)
  • 1 small onion, diced
  • 5-6 oz of fresh, organic baby spinach
  • 5-6 oz of button or portabella mushrooms, chopped
  • 6 strips of bacon
  • 1 1/2 cups of cheddar cheese, grated
  • 5 eggs
  • 1/2 cup 18% table cream
  • 1/2 cup rice milk (or cow's milk)
  • 1/2 tsp cayenne
  • 1/2 tsp paprika 
  • Salt & pepper to taste    

Steps:

1) Preheat oven to 375 degrees F.

2) Cook bacon until it's just starting to crisp. Reserve about 1 tbsp of the bacon grease.

3) Saute onion & mushrooms in the bacon grease until soft.

4) Reduce heat and add spinach. Stir for 1-2 minutes until wilted.

5) Chop bacon into 1/2-1 inch pieces and add back in. Stir for another minute.


6) Spread mixture evenly into two shells. Top with grated cheese.


7) Whip together eggs, cream, milk, cayenne, paprika, salt and pepper to make a custard. Pour evenly on top of the base ingredients in each shell.


8) Bake for 40-45 minutes.

9) Let stand for 10-15 minutes, serve and enjoy!


Do you like to make quiche? Do you have any favourite recipes / ingredient combinations you would like to share?