I once read that "cloth diapers are the gateway drug of green parenting"
and I have to say, after 2 years of CDing our daughter, this is bang on.
Cloth diapering has opened my eyes to the fact that there are a plethora
of other reusable alternatives to personal and household items that
most commonly come in a disposable form - for example, cloth wipes,
(un)paper towels, coffee filters, straws, wrapping "paper" and, yes indeed, feminine hygiene products.
My first foray into a reusable option for contending with Aunt Flo was The DivaCup, which I had the opportunity to review this past winter
(in the nick of time - got to use it for a single period and then
boom, Li'l Man decided he was ready to start camping out down there!) The DivaCup is a specific brand of menstrual cup, which is one main type of reusable monthly solution. The other type is cloth menstrual pads or, as they are often affectionately referred to as, "Mama Cloth". So basically menstrual cups are the reusable equivalent of tampons (an internal solution) and cloth pads are the reusable equivalent of disposable pads (an external solution).
I did have a positive experience with the DivaCup in the limited time I got to try it and certainly plan to use it again when my regular cycle returns, however I've been eager to try "Mama Cloth" as well for a few reasons:
A menstrual cup (such as my DivaCup) is not an appropriate solution for postpartum bleeding, which I'll obviously be contending with shortly!
The DivaCup does take some time to insert, remove and clean. As such, I feel like I would likely prefer cloth pads at times when I'm in a hurry, when I'm out and about, on lighter flow days, etc.
Cloth pads come in the coolest variety of styles, patterns and textures! Similar to cloth diapering, I can see it becoming almost addictive trying a bunch of different varieties. :)
Menstrual cups have recommended replacement guidelines (e.g., one year for the DivaCup) whereas cloth pads should last much longer than this, assumimg they're well-made and cared for properly.
During my postpartum period, I'll be getting the opportunity to review various brands and styles of "Mama Cloth" from a few different vendors, and you'll be getting the opportunity to enter and win some of your own! Stay tuned. :)
Curious to hear - how many of you have already tried mama cloth? Love it? Hate it? What about menstrual cups? Feel free to share your preferences and your stories! :)
Our sweet daughter S just turned two and was lucky enough to enjoy not one, not two but THREE birthday parties hosted by all her wonderful grandparents! (Which meant that Mom and Dad had to do very little, which was admittedly nice. ;)
During my last update, I thought I might be fast-tracking toward an early-ish labour, but here I am a week and a half later, still "with child". According to my midwife - 38 wks 5 days. According to my own calcs, exactly 38 wks.
And, oddly, my belly looks higher as though the baby has moved back up a bit. Is that even possible?
My heartburn's particularly bad tonight, which corroborates the inexplicable "move up" theory.
Weight-wise, just clocked in at 144.4 lbs so basically no change here since the last update.
Given the uterine artery "notching" noticed on my week 35 ultrasound, my midwife ordered a follow-up for earlier this week. As I mentioned on my FB update, everything looked fantastic! Little man scored 8/8, weight estimate was 3200g / 7 lb 1 oz (44th percentile), fluid was 132 (normal b/w 73 and 239), head was "presenting" (i.e. locked & loaded), notching no longer present and cervix approximately 50% effaced. I'm not a fan of excessive ultrasounds, but it *is* nice to have one which results in such a bundle of good news! ...
....plus a cute pic of our li'l sleepyhead! :)
Almost forgot to mention the other nice tidbit - Group B Strep came back negative. w00t!
Still feeling pretty good all in all. I'm actually enjoying a bit more energy than I had a couple weeks ago, probably because my iron's back up closer to normal range. Noticing more minor aches and pains when I get out of bed, drive longer distances, etc. but all the usual "getting close now!" stuff I'm sure. And my appetite continues to be more than healthy. For example, today at lunch I scarfed down a 12-inch sub and half a bowl of soup. Where exactly the room exists for this volume of food is certainly perplexing, though (come to think of it) the fact that I now have heartburn isn't so much. :)
During the last few days, Little Man's been following in S' late preggo footsteps, seemingly on a quest to "dig" his way out. Lots of less-than-pleasant (but interesting!) jabbing sensations all over but especially, y'know, in the direction that he's headed. Fun stuff!
In other planning/logistical news, the basement is coming along fabulously. Framing, electrical, drywall, mudding, sanding and primer are all complete; now we just need paint, flooring and a whackload of cleaning to get rid of all that pesky drywall dust and it's DONE! This'll be SUCH a relief as we'll finally get to move the office and a bunch of other stuff downstairs, allowing us to start on S' long overdue big girl room so that li'l man can have the nursery.
Regarding the "necessary basics" for his arrival, we've been in "lazy prep" mode. :) We still need to get the bassinet up beside our bed, however I did at least clear space for it. (An important first step, right?) And I washed a bunch of sleepers and onesies. AND MY HOSPITAL BAG'S NOW PACKED, OK?!?! Y'all kicked me into gear with this one! ;)
Chris is convinced this kid's gonna arrive tomorrow (on S' birthday!!) because all three grandkids in his family were born on the 24th day of some month. I do have that in the back of my mind a bit but am more inclined to believe he's gonna dawdle like his sister. And then be HUGE when it all goes down. Let's keep things under 9 lbs, OK bud? Please and TY! :)
So whaddya think's up next - another Tw#2 update or a birth story? (!!!)
I'm super-excited and honoured to be partnering once more with Stonz, a Vancouver-based company which offers uber-practical and stylish outerwear options for infants and young children. I first worked with Stonz in January, 2012 on a review/giveaway for their flagship Booties footwear (and corresponding Linerz accessory). I encourage you to hop on over to my Booties review to learn more about this amazing product and also get a glimpse of the company's roots and values. You can also view the Stonz story via this short video clip:
I'm back now to review Stonz Youth Mittz, which the company is proud to announce are new & improved this season!
Product Information:
These Youth Mittz are designed to stay securely on, while keeping the cold out. Inspired by the harsh Canadian winters, they are made to the highest standard, ensuring your little one's hands will remain warm in the coldest climates.
Improved insulation with Thinsulate (TM), an extra thin layer that keeps the Mittz soft and flexible
Durable water and wind resistant coated Nylon, with a weatherproof membrane with a psi of 5,000
New & Improved Fit and design
Extra-long wrists are designed to go over outerwear, with 2 toggles to ensure they stay on
Back of thumb has fleece to relieve wet noses
Clips ensure Mittz don't get lost
Blank tag to write your name on so you never lose them
Suitable for skiing, boarding and other Winter Sports
Machine wash and dry, inside out, on delicate
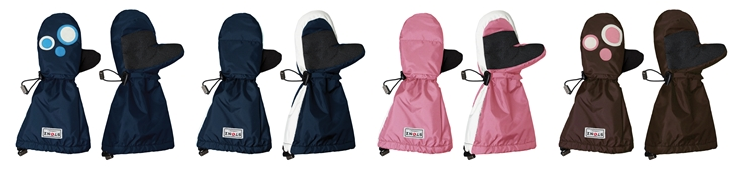
Youth Mittz come in two sizes - Small/Medium (2-4 yrs) and Medium/Large (4-8 yrs) - and are available in a range of gender-specific and neutral colours and styles. Here are just a few:
My Review:
For review purposes, I selected the small/medium size in the black & white colour. Our daughter is turning 2 shortly and we have a little guy due any day, so the practical part of me decided to go gender-neutral so they can share, figuring that 1) by the time she's done with them, he'll be all set and 2) this is a Stonz product, so they're definitely going to last through 2+ kiddos!
Our Mittz arrived in a cute little reusable bag with a hand-written note and 2012 product guide - nice touches! Here they are, brand new withtags!
My first impression - wow, a lot bigger than I thought they'd be! I even checked the label to ensure I hadn't received the large size by mistake. Nope - small/medium indeed! For kicks, I tried one on myself. I could get my hand all the way to the bottom, though (as expected) the mitt part itself was much too small/short for my long "piano playing" fingers (as my mom used to say :).
Given these mitts are designed to go over outerwear, the roomy design totally makes sense. Add in the dual toggle closure/tightening system (which is used on their Booties as well) and you've got a mitt that goes on easily, stays on and keeps the snow out. A combination that's inexplicably hard to find in most mitts I've come across!
The features on the front of each mitt are well thought out too. The front face is covered with a grippy material (which should prove helpful for grasping those slippery snowballs!) and I love the fleece lining the thumb. As gross as it may be that kids smear snot all over their mittens, well they do - and I'd imagine it's a heck of a lot nicer for them to rub their li'l noses into soft fleece than a waterproof material that just ends up spreading the ickiness all over their faces!
The clips are also a nice addition to ensure the Mittz stay together when not in use. (I'm sure we've all experienced the frustration of easily finding one half of a pair of mittens, shoes or what have you, and the other's evidently taken a leave of absence!)
As for overall quality, the Mittz appear to be very well made. I did notice a few loose threads in various spots, however I tugged/pressed around at them and they all appear to be superficial and not pose a durability risk. In general, the stitching is nice, tight and even across the board.
Alright, time for "real world" testing!
So the first time I tried to outfit our daughter with her new Mittz, she balked. She did NOT want these new things on her hands!! Uh oh, I thought - this review may prove challenging! When I tried again a few days later, she cooperated, but it became clear pretty quickly they're still too big for her. Her hands pretty much drowned at the bottom and it was challenging getting her little thumbs where they were supposed to go. She had them on for a total of about 12 seconds before proclaiming "Too big! Too big!" and yanking them off, though I did manage to snap a pretty cute "Don't mess with me!" pic!
It's not surprising she isn't ready for them yet, as she's still not quite 2 years old (the minimum age listed for the small/medium size) and she's petite (less than 10th percentile weight, 25th height and still wearing Size 5 to 5.5 shoes which fit the average 12 to 18 month old). So in her case, I'm thinking the small/medium will fit best from 3 to 5 yrs.
All this left me with a bit of a conundrum for finishing my review, so I recruited my neighbour's almost 3-year-old son to be a guest tester. He did a great job!
Lookin' good, all bundled up for a chilly November day!
"Mom, I heart these! Can I keep 'em?" :)
My neighbour provided the following feedback:
They were super easy to put on and take off
Thumbs slid in easily
Kept his hands nice & toasty!
He didn't mind wearing them
It was somewhat challenging for him to perform tasks such as picking things up, gripping, etc. but she also said she's yet to find a warm winter mitt that doesn't "cripple" a young kiddo this way.
When I asked if he used the "snot wipers", she said she hadn't actually noticed these, but thought it was a brilliant feature!
All in all, definite thumbs up (no pun intended) from my guests. (Thanks so much C & C! :)
Next up - care & maintenance. To prep, I turned each mitt inside out as advised. (Note - this was actually a bit of a pain, as the thumb in particular didn't want to flip in the other direction. But nothing really to write home about considering they'd probably only need to be washed 3-4x per season.)
As I tend to do, I "stretched" the recommended laundry guidelines and threw them in with a regular (non-delicate) load, though still on cold. I followed up with a machine dry on low. After flipping them back the "right" way (again, had to wrestle a bit) I'm happy to report they'd emerged in perfect shape. Whew - always a bit of a gamble laundering a new product for the first time!
Overall, it would appear that the new & improved Youth Mittz are yet another extremely high-quality, practical and well performing product from Stonz. I do feel the need to preface this with "it would appear" due to the lack of hands-on testing I was able to perform myself, however all available signs point to this conclusion. :) Way to go, Stonz - can't wait to see what you come out with next!!
Buy It:
Youth Mittz can be purchased directly from the Stonz website (shipping is free within Canada and Continental USA on orders
over $50) and from select retailers. Now's a great time to stock up on Stonz gear, as the company is offering 25% off select styles until November 26th as part of their Black Friday - Cyber Monday Sale! Hurry over - quantities are limited!
Win It:
Stonz has generously offered to give away a pair of Youth Mittz to one lucky Manager to Mom reader! Winner chooses size and style. Open to CAN/US.
To enter, fill out the Rafflecopter form below. Please
follow all instructions within each entry option to ensure your entries
are valid.
Disclosure: The prize is being provided and shipped to the winner by Stonz. I
received no financial compensation for writing my review or offering
this giveaway, although I did receive the sample item free of charge. This is my completely honest opinion above and may be different from yours.
A couple weeks ago, my husband and I attended an introductory photography workshop through Macro Class consisting of a landscape photo walk (during which we were required to shoot in manual mode) and an Adobe Photoshop basics class. Here are a few tidbits from the sessions!
Stepping down the aperture (from f/5.6 to f/11):
A "storytelling" composition (low aperture - f/16):
Hubs enjoying the soft evening sunlight (high aperture - f/5):
Natural lighting conditions - too much, too little and just (about) right!
30-second application of a levels adjustment layer in Photoshop - what a difference!
Have you ever attended a photography class/workshop? How would you rate your own photography and/or editing skills?
There's no time like the present for starting to prepare for tomorrow. Preparing for emergencies or times of need by buying food storage is a worthy pastime. Gathering any amount of food storage is no small task and it costs money. Money that you don't want to see go to waste by having food spoil due to lack of protection. Trust me, there's nothing worse than needing to use your food storage, opening it up, and finding that it's infested with some little bug or rodent. It's happened to me, so here are the best ways to protect your food against invaders.
Freeze What You Can. Freezing foods like flour, rice, and other grains can prevent a bug infestation. It also helps prevent any larvae from hatching which may already be in the food. The problem we run into is that freezer space is limited, and storing everything in a freezer is not practical. So pick out the most coveted grains and freeze them. You don't necessarily need to leave them in the freezer forever; freeze them for a week and then take them out. All the bad bugs should be dead.
High Density Buckets. Professional-grade thick plastic buckets are rodent-proof. That means there's no way those little rats and mice can chew through a bucket containing your food storage. I recommend the 5 gallon premium food storage containers that meet FDA standards.
Mylar Bags. Mylar bags are made of a thin metal material that have been created for lining food storage bins. The great thing about mylar bags is that they can be sealed with heat creating an oxygen barrier to the outside. You need to place low moisture foods, like beans, with oxygen absorbers in your mylar bags. Then put your mylar pouches in rodent-proof containers.
Carbon Dioxide. For those packing their own food storage, making sure your product is free of pests before you seal it up is important. The big companies fumigate food using a series of chemicals which works very well and kills lots of the insect larvae. For the home food storage packer, dry ice is a great way to do the same thing. Dry ice will fumigate products with carbon dioxide gas. It's heavier than air so it stays low in the container. Simply place a sheet of dry ice at the bottom of your food storage container and let the gas cover the food and all the bugs should die.
O2 Absorbers. Oxygen is not your friend when it comes to keeping your food pest-free. Oxygen absorbers or silica packets work great when preparing your food storage. Simply place them at the top of the food before they are sealed and it will soak up all the oxygen. Insects need oxygen to thrive, so by removing oxygen they can't thrive and they will die.
Bay Leaves. Spreading bay leaves throughout the food storage container is a popular way of deterring pests. Bugs don't like the smell of bay leaves. You don't need very many leaves to do the trick. Just add 5 to 10 leaves for a 5 gallon bucket. You can also spread the leaves throughout cupboards containing the food storage. Bay leaves will not affect the taste of your food.
Temperature. Proper temperature is crucial to food storage. The most ideal temperature to keep your food safe for a long time is 75°F or 24°C. This comes into play when people decide to store their food storage in the garage or shed. Sure there's more room out there, but the temperature fluctuates way too drastically for the food to remain safe for a long time. Keeping temperature consistent will not only protect your food against spoilage, it will also protect it against those nasty pests...bacteria.
Diatomaceous Earth. Mixing Diatomaceous Earth into your food storage, like beans or grains, can control insects. When purchasing your Diatomaceous Earth, make sure it's approved by the FDA for human consumption. There are companies which make it for swimming pools and this type can contain lots of harmful chemicals. Using this method is really easy: for every 40 pounds of grains, add 1 cup of Diatomaceous Earth. This should kill the bugs and you can still eat the food mixed with this product.
Use Glass. Glass containers work really well to create an airtight oxygen-free environment when combined with oxygen absorbers. The nice thing about using glass containers is that you can store things in "every day size", as some people hesitate to open a 5 gallon bucket of sealed grains unless it's absolutely necessary.
Vacuum Sealing. Vacuum packaging your food storage is another great way to get the oxygen out. Remember without oxygen all the little critters will die. I put vacuums sealing at the bottom of the list because honestly it's hard to vacuum seal food really well. The food needs to contain less than 1% oxygen, and that's not easily done with vacuum sealing. That said, it is still a good idea to vacuum seal your food but you will want to supplement this approach by using oxygen absorbers.
Women's fashion is an area I haven't dabbled in too much (yet) here at Manager to Mom, however when the opportunity came along to review a brand-new, ultra-practical AND stylish clothing accessory called the Cleava, I knew I had to snap it up - yes, pun intended. :)
The Cleava is "The Original Snap To Bra Camisole" - a mock cami which
attaches to your bra and creates a layered effect, allowing you to wear
low-cut tops without exposing, well, more than you want to expose (in situations where a li'l modesty is preferable!)
As a mom of a toddler, I'm constantly bending down to reach my little girl's level, pick up toys, etc. so I'm particularly prone to inadvertently showing off my assets, if you will. My go-to solution prior to discovering the Cleava was layering full camisoles/tank tops under such revealing tops, but this was less than ideal for many reasons - too bulky, too hot (in the summer), extra unsightly straps kicking around and additional laundry, to name just a few. The Cleava is designed to solve all of these issues and more.
Another thing the Cleava boasts is that it is applied (and removed) quickly in three easy steps.
Machine washer and dryer safe (though hand wash is recommended for rhinestone collection styles)
Wrinkle-resistant
The following video further illustrates just how easy it is to attach/detach the Cleava, and shows off several of the available styles & colours.
My Review:
For review purposes, I was sent a combo set containing an original black and original white Cleava. This was perfect for me as I'm a practical gal. :)
Right away I appreciated how soft, stretchy and silky the material is, and the high quality construction. Both Cleavas were exactly the same size and were stitched perfectly.
Each Cleava has three snap settings on each side and four up the middle. Coupled with the stretchiness of the material, this would definitely allow for quite a bit of flexibility in the sizing.
The buttons snap together firmly so there's no concern that they'd come apart during regular wear.
I'm a tall, thin gal (aside from my huge belly, that is ;) so I get a really nice fit with all snaps at the smallest/tightest setting.
I'm pleased to report that the Cleava is, indeed, as easy to put on as advertised. I can get it snapped and shifted properly into place in less than 20 seconds, and I'm far from the most manually dextrous person out there. It's easiest to apply with just a bra on, but it's certainly doable when you already have your shirt on as well - just takes a few more seconds to get things sorted out.
It's also nice and comfy. Once it's on, you don't notice it.
As for the look, LOVE LOVE LOVE! Here are a couple styles I've tried so far.
I'd estimate that a third of my tops quality as low-cut, so I've been bustin' out my Cleavas regularly since I received them. I totally dig the layered look I can get without all that extra bulk, and of course the classic white and black go with just about everything. The design appears to achieve the perfect balance between sizing flexibility and a seamless look, as even with the snaps on the smallest setting the side tabs stay hidden. They only have a chance of becoming slightly visible when I bend waaaaaay over and the particular top is super low-cut.
I tested my Cleavas with various bras of different shapes and styles (including a nursing bra), and all combinations worked just fine. I was happy to discover that I shouldn't even have to unsnap the Cleava to nurse as the material sits off to the side and thus likely won't get in the way. Sweet!
Finally, over the course of a full day, the Cleava stays perfectly in place. Literally no adjustments needed. Another big, important thumbs up!
As for care & maintenance, I tested a machine wash warm / machine dry low combo on one of my Cleavas and it came out mostly unscathed. It indeed proved to be wrinkle-resistant (as I didn't "rescue" it from the dryer until a few hours after the cycle ended, and it was still totally wrinkle-free) and it maintained its shape perfectly. However when I compared it to the unwashed Cleava, I noticed ever-so-slight shrinkage. Nothing noticeable in practice, I'd say, however to be on the super-safe side it might be best to wash on cold and air dry.
All in all, I truly do love this product - kudos to the inventor, Michelle, for creating such a practical, easy-to-use, stylish and affordable fashion accessory! In my opinion, every woman should own at least a few Cleavas. Seriously. The only downside - your man may not be quite as happy, lol. But he can deal! ;)
Connect!
To stay up-to-speed on all things Cleava (new colours and styles, news releases, sales announcements and deals) follow Cleava on Facebook, Twitter and Pinterest.
Buy It:
You can purchase one or more Cleavas of your own directly from the website or by calling 1-888-692-5328. It's a great time to stock up as Cleavas are on sale now at $10 off, plus you can get free shipping on orders over $50 with the code FSMTM (good until December 13th, 2012). With the holidays approaching, why not grab a few extras as stocking stuffers?
A little more incentive: Michelle De Sousa, the inventor of Cleava, is so confident you're going to love your Cleava that she is offering The 30 Day Guarantee. If, for any reason, you are not happy with your Cleava you can return it within 30 days.
Win It:
One lucky Manager to Mom reader will win a snazzy Original Classic - Red Cleava of their own! Open to CAN/US.
To enter, fill out the Rafflecopter form below. Please
follow all instructions within each entry option to ensure your entries
are valid.
Disclosure: The prize is being provided to the winner by Michelle De Sousa, the inventor of Cleava. I
received no financial compensation for writing my review or
offering this giveaway, although I did receive the sample items free
of charge. This is my completely honest opinion above and may be different from yours.
Well, full term according to my midwives, anyway. Using their "wheely thing", they determined that my due date is Dec 2nd. By my own "first day of my last period" calcs, it's Dec 7th. So I'm either a couple days past 37 weeks or a couple days shy of it. I'm going with the former because I have the suspicion I'm going to pop pretty soon. Little Man has definitely dropped, and I've been experiencing some interesting "Braxton Hicks but Different" sensations. All in all, I feel like I'm "ripening" if you know whadda mean.
In any case, I'm officially huge now. :)
Current weight: 145 lbs so still on a 1 lb/week gaining schedule. I was measuring a bit small at my 35th week appointment so my midwife ordered me a biophysical profile / growth ultrasound which turned up "mostly normal" results - baby scored 8/8 with lots of fluid and measured at about 40th percentile in weight (estimate was 2.5 kg or 5.5 lbs). However the more in-depth report (which takes longer to come in) cited there is "notching" on my uterine artery. My midwife said this is almost certainly nothing to be concerned about in my situation (full term, low blood pressure), but to play it safe and ensure baby continues to grow well, she's booking me for another ultrasound at 38 weeks. If I make it that long, of course! :)
Other health-related stuff - hemoglobin's up a bit more to 107 (good) and Group B Strep swab's been sent in but no results yet. Bathroom trips are now required once or twice / hour (yay) though thankfully the bleedy nose problem has taken a hike. I do have minor heartburn from time to time but nothing like my last pregnancy, and I've also managed to remain totally unbloated which has enabled me to keep my wedding ring on! (Had to remove it at 32 weeks last time around.)
I'm definitely feeling increasingly tired as these late-preggo weeks pass, and the last few days have brought on some emotional spells as well. Crying for no reason, snappishness, that sort of thing. Pregnancy, as a whole, keeps me quite level so these spells are unusual and add to my inkling that Babe #2 will be coming early. Of course, there are also 2348203432 things going on in our lives right now - finishing up work (3 more days!), numerous home renos, loose planning around S' 2nd birthday (keeping things simple this year), regular activities (swimming, kinder music, curling, yoga), early Christmas planning/shopping, attempting to keep things somewhat manageable around the home front and, of course, blogging when I can grab a spare moment or two. Juggling it all has become fairly overwhelming, not to mention that we remain totally unprepared for our little guy's arrival. We're almost certainly not going to have S' "big girl room" ready in time (it's still a semi-hoarded office, where I sit typing now) which means she'll need to remain in the nursery for awhile. Not a huge deal since the little man will hang out in our room for a couple months anyway, but it would be nice to have all our ducks in a row here. Following my first bout of BHbD sensations the other night, hubs DID get the car seat ready so we can check that one off at the very least. :) (Now, someone kick me into gear to get that hospital bag together!)
As per my recent FB post/question, I'm still not doing a heck of a lot to prepare (physically, mentally, emotionally) for labour and birth. :-/ Still doing a weekly yoga class which is SUPER awesome, and I bounce around on my exercise ball when I think about it, but that's about it. I do have a little evening ritual of slathering Belly Jelly all over my bump, which is somewhat meditative in of itself and hey - if it manages to reduce the severity of impending stretch marks, even better. (Yup the little rascals are beginning to make an appearance, but they're not terrible just yet.)
As for S, she TOTALLY appears to "get it", giving my belly lots of kisses and telling people that her little brother's coming soon. She loves reading It's Quacking Time and on the last page points out the members of the duck family as Mommy, Daddy, S and [insert brother's name here]. (Nope, still not telling! :)
So let's play a guessing game - when (date/time) is our Little Man going to arrive? Is there gonna be another T w/ #2 update?
If so, I'd LOVE if you'd take a moment and vote for me as one of this year's Top 25 Product Review Moms over at Circle of Moms!
Simply click the badge, scroll to/search for my listing and click the Vote icon. Easy peasy! (Note that from Nov 9 to Nov 10 I'll be under the Pending Approval tab while they approve my listing, but you can still vote for me under there!)
You can vote once/day until November 16th. I appreciate each and every vote!
If M2M makes the Top 25, this should open the door to even more great brands and products to review, and giveaways to share with you as well!
I want to thank Circle of Moms for this opportunity to be recognized for something I put a lot of thought and hard work into. It's important to me to ensure each and every review I post here at Manager to Mom is detailed, high-quality and honest and I hope this is of value to my readers as well!
Does the name Lil Helper ring a bell? If so, you may remember the brand as the "grand finale" review/giveaway in my Fluffy February cloth diaper event early this year. If not, I encourage you to check out my prior review for info on this unique, all-Canadian cloth diapering brand and their products as they certainly stand out from the masses in a number of key ways.
Fast forward several months later and I'm happy to report that:
My LH diapers continue to be among the first I grab for new changes, and they always get packed in the daycare diaper bag too! LOVE 'em!!
The company is firmly committed to ongoing improvement in their products. For example, their original cotton insert has been revamped so that it no longer gets bunchy/warped after prepping, as I'd reported in my previous review.
Lil Helper recently began branching out and offering additional eco-friendly products, including a super-sized diaper pail liner, and two organic bamboo / waterproof pads (a mattress protector and a change mat). And guess what? I've had the opportunity to review two of these new products which I'll share with you today.
Product Information - Diaper Pail Liner:
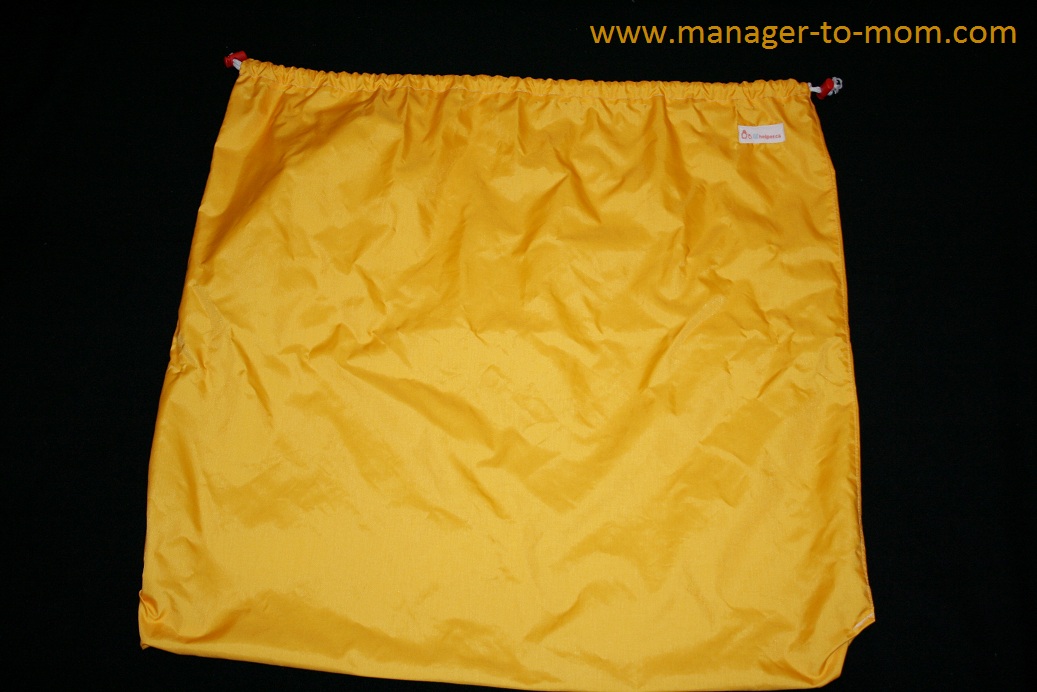
Size: 28 in x 28 in
Colors Available: Red & Yellow
Before I begin here, an important note - the version of the pail liner I received for review purposes is different than what the company will be offering in the future. Mohammed (LH's "Chief Everything Officer" - love it!) confirmed that they will be switching suppliers and likely materials as well. The current liner is made from laminated nylon, the same material used to make windcheaters and other wearable waterproof items, however the company is leaning toward PUL (which they already use in their smaller wet bags) for the future version. I wholeheartedly approve of this choice, as I own several PUL-based wet bags (including one of their own, which rocks) and it has definitely proven to be a "workhorse" material in terms of its lasting waterproof qualities. And it's safe too!
All that said, here's my own "V1" pail liner. I received the snazzy, bright yellow shade!
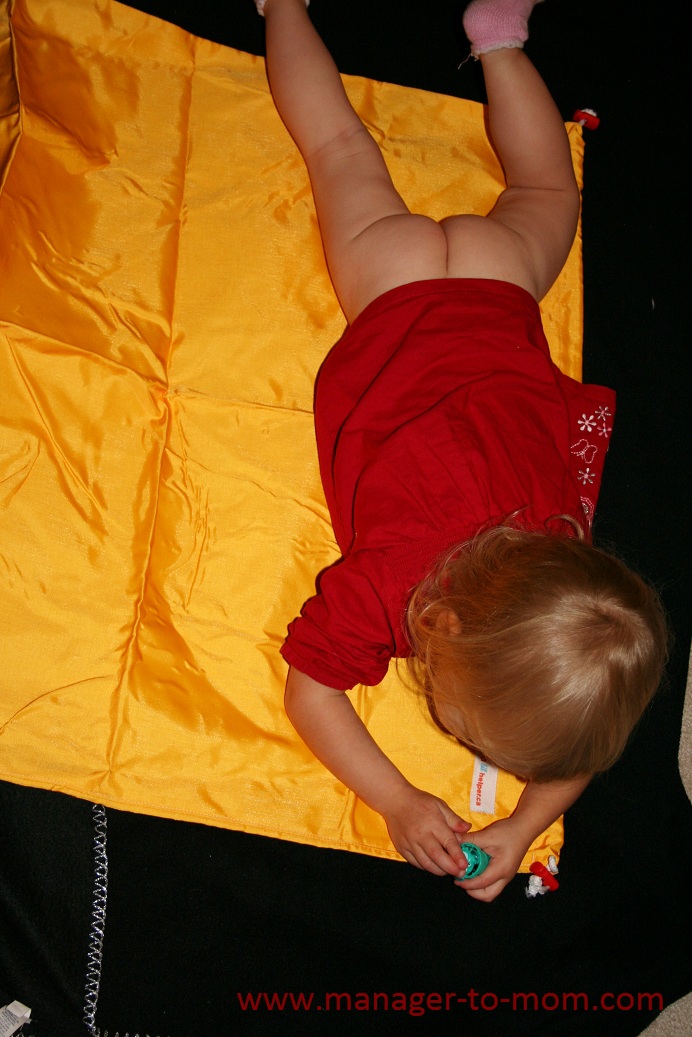
A picture of the liner alone doesn't really give a good appreciation of size, so I recruited my (then) 22-month-old daughter for some assistance.
Roomy, huh? Mohammed told me they designed the liner to fit the largest diaper pail they could find - a whopping 24 gallons. This would definitely hold multiple days of dirty dipes for a single child, and probably 2+ full days if you have a couple little ones in cloth. (We'll likely be in this situation for at least a month once our Little Man arrives!)
The bag uses a drawstring closure. Here you can see it open...
...and pulled shut:
The inner laminate material sort of stuck together at first, so I had to pry it fully open in order to wash it properly (along with my regular diaper laundry). Once washed a couple times, however it had a similar feel to my PUL wet bags - just slightly stiffer/bulkier.
The pail liner can be used as, well, a pail liner (no, really?) or a hanging wet bag. We've grown accustomed to the latter and, in fact, simply keep the liner plunked down on our bathroom floor as it gathers its contents for the next wash. We find it holds smells at bay quite well, so we're not inundated with an unpleasant olfactory experience during our DD's bath time, which is appreciated! That said, we have been casually shopping around for an actual pail which has either a flip lid or no lid at all, as we like the concept of a totally hands-free operation.
Have I mentioned that the liner is huge? Here it is holding two full days of dipes - including a Lil Helper one, of course! ;) - and not even at half capacity.
It's also very strong. I can haul a full load o' dirties down to our laundry room using the drawstring closures without concern that the liner will rip.
In terms of laundering, I've had best results turning the liner inside out and pulling it about two thirds closed for the wash cycles. The one time I washed it without drawing it closed, it "collected" an errant microfibre insert which came out of the wash all stinky. Not good! I haven't had this issue since I started drawing it partially shut.
I have noticed a different issue cropping up, however. Small patches of the laminated inner are beginning to peel off, particularly near the top seam. Thankfully I haven't yet experienced leaking/wicking due to this, though if the problem continues to get worse I think this'll be likely at some point. I'm wondering if the nylon material is more vulnerable to the hot wash cycle temperature than PUL, since I haven't noticed this with any of my other wet bags? I always hang the liner to dry, so it's not a dryer heat issue. Come to think of it, the aforementioned hauling of the bag down to the laundry by the drawstrings could have something to do with it too? In any case, obviously not ideal as a pail liner should be able to stand up to a serious beating - don'tcha think? :)
All in all, I'm loving the size and function of my Lil Helper pail liner, and encourage the company to carry these aspects forward to the "new and improved" version which will hopefully resolve the peeling issue as well. Then we'll have one seriously awesome pail liner, folks!
Product Information - Organic Bamboo Change Mat:
Once more, the whimsical humour of the Lil Helper folks are at work on the description for this product, so I encourage you to read the full write-up on their website. The quick version:
Size of mat: 18" x 22"
Top layer quilted with organic bamboo / organic cotton (70/30) on both sides
Top layer contains a specialty fabric which can absorb 10x its weight in liquid
Naturally-wicking surface material retains a stay-dry feel
Waterproof bottom layer made from a safe, medical-grade waterproof material guaranteed to last 200 commercial launderings.
Top layer is made from pesticide and bleach free organic bamboo. Waterproof barrier is phthalate, BPA and lead and heavy metal free
Organic bamboo/cotton layer is pre-washed to prevent shrinkage
Manufactured in Canada
My Review - Organic Bamboo Change Mat:
Upon receiving the change mat, my initial two observations were that the top layer is super soft & pleasant to the touch, and that the mat appears to be extremely well constructed. The stitching is perfect and the advertised measurements (18" x 22") were spot on.
Here's a close-up of both sides of the change mat - the quilted organic bamboo / organic cotton top layer and the waterproof bottom layer.
Here's the quilted side laid flat.
Similar to the pail liner, however, we need some context to get a true appreciation of size. So here y'go!
(Side note - I was quite impressed that our DD actually lay still for several pictures! She must've felt nice & comfy on there. :)
As it can be seen, the mat is nice & wide. It's not a bad length either (definitely plenty long for babies) but at the mid-to-late toddler stage your little one's head will probably be off the mat (like you can see with our 23-month-old, above) so you might want to place something cushiony & ideally antibacterial under his/her melon, especially when changing on a public table.
When I asked Mohammed about the possibility of extending the length (or adding a head piece) for toddlers, he mentioned that if this type of change were made to the current mat, it may become too bulky to fit in a diaper bag. However, they're considering the introduction of a new waterproof mat with a thinner top layer, allowing them to make it larger but still portable. Cool - always good to have options!
Before using the mat, I prepped it by washing it twice along with my regular diaper laundry. When I re-checked the measurements afterwards, I did notice slight shrinkage (they were down to 21.25" x 17.5") which resulted in ever-so-slight unevenness of the layers but certainly nothing to impact functionality. Really a picky observation if anything. (Though you know me - I feel obliged to report these too. ;)
I also tried the absorbency trick as demonstrated in the video (embedded above). After two washes, liquid kind of pooled on top for several seconds before it began to soak in. But once it did absorb, it was clear that the mat could contain a lot of it. Mohammed advised that the top layer continues to get more absorbent with multiple washes, similar to diapers made of natural materials (e.g. prefolds). And indeed, after wash #4 I tried again and liquid absorbed much more quickly. I actually got my mat to "drink" about a cup and a half of water (more than double what was demoed in the video) and the waterproof bottom layer still did its job, keeping the area underneath the mat dry. Eventually the top of the mat lost its stay-dry feel, however this is surely inevitable at a certain point. Fun to experiment, in any case! :)
One more minor issue to report. The other day I noticed that the bottom of my mat had developed a superficial scratch. This hasn't impacted the waterproof quality, however it made me realize that a li'l TLC is probably best with this item - e.g. wash only with cloth diapers (being careful all aplix is fastened securely), hang to dry and ensure there's nothing sharp/scratchy beside the mat when stored in a diaper bag. I tend to (purposefully) put my review items through the wringer, and in this case I'd washed the mat at least once with a regular load of my daughter's clothing (including jeans and other pieces with zippers and embellishments), plus it's been shoved into different sections of our diaper bag with other miscellaneous items. Moving forward I'm going to be more careful as I definitely want this mat to stay in good shape, especially with Little Man on his way!
All in all, I highly recommend the Lil Helper Organic Bamboo Change Mat if you're looking for a mat which functions well, is comfy for your little one and boasts safe, high-quality materials and worksmanship. Our daycare provider sends along her endorsement as well: Great mat! seems comfy, folds easy, so as long as it washes well, I would recommend it!
Just keep in mind you'll need to be a bit careful with care and maintenance to keep it in perfect shape, and that it's a bit on the short side for toddlers, so you might want to carry around an additional cushy piece (hat, small blanket, etc.) to go under the head in this case.
Buy It:
You can purchase Lil Helper diapers and accessories directly from the company website, or take a look at their Where to Buy page to find a 3rd party retailer (though note that at this time there is only a single retailer, diaper-eez, based in Toronto.)
Win It:
One lucky Manager to Mom reader will win an Organic Bamboo Change Mat of their own! Open to CAN/US.
To enter, fill out the Rafflecopter form below. Please
follow all instructions within each entry option to ensure your entries
are valid.
Disclosure: The prize is being provided to the winner by lilhelper.ca. I
received no financial compensation for writing my review or
offering this giveaway, although I did receive the sample items free
of charge. This is my completely honest opinion above and may be different from yours.